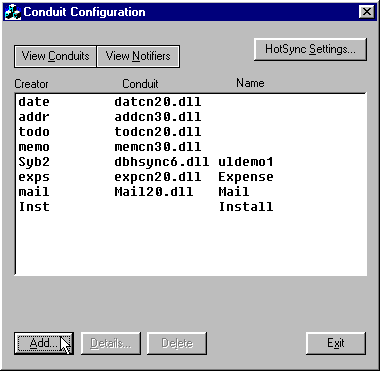
13 - Create the Conduit Registry Entries
You must update the Windows registry with information about the conduit
used by your application, including the Creator ID.
-
The Conduit Configuration program condcfg.exe
may be used for part of the work, and it is available
for download from both Sybase and Palm Computing
(see Section 4 - The Download List).
-
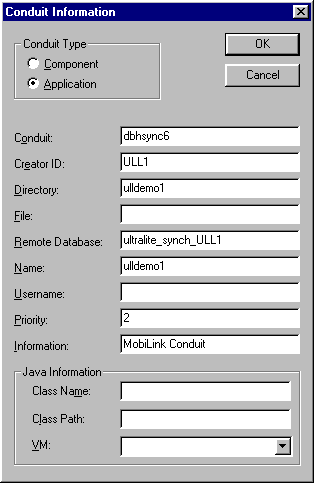
Click on Add to display the Conduit Information window, then fill it in
as follows (where "xxxx" is replaced in two locations with the
Creator Id; e.g., ULL1):
- Conduit Type: Application
- Conduit: dbhsync6
- Creator ID: xxxx
- Directory: ulldemo1
- Remote Database: ultralite_synch_xxxx
- Name: ulldemo1
- Priority: 2
- Information: MobiLink Conduit
-
Press OK to save the conduit registry entries.
-
Sadly, we're not done messing around with the registry; more stuff must be added
using the Registry Editor:
-
C:\WINDOWS\REGEDIT.EXE on Windows 95
-
C:\WINDOWS\REGEDIT.EXE on NT 4
-
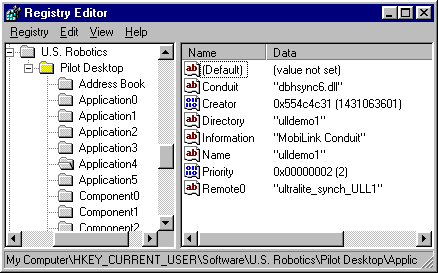
Find the section HKEY_CURRENT_USER - Software - U.S. Robotics
- Pilot Desktop - Applicationx, where x is some number that's
been assigned to the new registry entry by condcfg.exe.
Note: On your machine the U.S. Robotics folder might be
called Palm Computing instead.
-
You can edit the registry entries directly in the Registry Editor, but you can also
export the entries to a text file, edit that file with Notepad or Wordpad, and then
import the file back into the registry.
First, use the Registry Editor menu option Registry - Export Registry File... to
create the file registry_after_condcfg.reg:
REGEDIT4

[HKEY_CURRENT_USER\Software\U.S. Robotics\Pilot Desktop\Application4]
"Creator"=dword:554c4c31
"Priority"=dword:00000002
"Conduit"="dbhsync6"
"Directory"="ulldemo1"
"Remote0"="ultralite_synch_ULL1"
"Name"="ulldemo1"
"Information"="MobiLink Conduit"
|
-
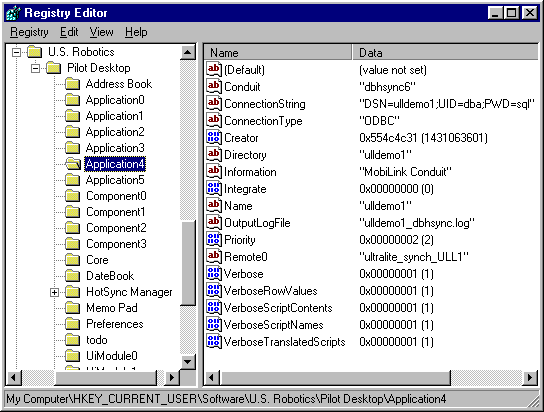
Next, add the 9 lines starting with "Integrate"=dword:00000000 to the file.
The first three new lines are required to tell the conduit how to connect to the database.
The rest are optional; they tell the conduit to write all sorts of
trace information to an output file called ulldemo1_dbhsync.log:
REGEDIT4

[HKEY_CURRENT_USER\Software\U.S. Robotics\Pilot Desktop\Application4]
"Creator"=dword:554c4c31
"Priority"=dword:00000002
"Conduit"="dbhsync6"
"Directory"="ulldemo1"
"Remote0"="ultralite_synch_ULL1"
"Name"="ulldemo1"
"Information"="MobiLink Conduit"
"Integrate"=dword:00000000
"ConnectionType"="ODBC"
"ConnectionString"="DSN=ulldemo1;UID=dba;PWD=sql"
"Verbose"=dword:00000001
"VerboseScriptNames"=dword:00000001
"VerboseScriptContents"=dword:00000001
"VerboseRowValues"=dword:00000001
"VerboseTranslatedScripts"=dword:00000001
"OutputLogFile"="ulldemo1_dbhsync.log"
|
-
Finally, import that file back into the Registry Editor via the
menu option Registry - Import Registry File...
Now the entries look like this, and the conduit's ready to run:
Note: The Creator value placed in the registry by condcfg.exe
is simply the hexadecimal representation of the Creator ID: 55 4c 4c 31 instead of ULL1.
In other words, you can build the whole thing by hand if you want.
|
|