
*better: More thorough, more relevant, more effective.
...more Alerts, more All Clears, more details, more control in your hands.
|
|
Foxhound is the better* Database Monitor for SQL Anywhere.
*better: More thorough, more relevant, more effective.
...more Alerts, more All Clears, more details, more control in your hands.
|
| [Home] | [Table of Contents] | [Previous Section] | [Next Section] |
Breck Carter
Last modified: February 23, 1998
mail to: bcarter@bcarter.com
Section One initializes the consolidated database on the central server via DBINIT and ISQL. It also introduces the optional backup, restore and "show current replication status" processes used in this demonstration.
At this point you might want to refer to Figure i4 in the Introduction for a list of files provided with this demonstration, and make sure they exist where they're needed: in the C:\TEST directory on the central server and in C:\TEST on a remote computer.
Step 1 - Make file replication subdirectories on the central server (required).
Subdirectories are required on both the central server and the remote clients for the purpose of sending and receiving the file-based replication messages. These message files will be written and read by DBREMOTE and DBREMOTW.
The following DOS command creates these subdirectories on the central server by running the batch file shown in Figure 1a:
c:\test\makecdir
Figure 1a - MAKECDIR.BAT - Make Replication Subdirectories On The Central Server
(This file is contained in rep.zip.)
pause To create replication subdirectories on the central server mkdir c:\test\consol mkdir c:\test\site0001 mkdir c:\test\site0002 rem ...etc., for other remote site names pause |
Figure 1b shows the naming convention used by SQL Anywhere, which works like this: the subdirectory name identifies the destination for the data (where it's going to) and the file name identifies the source (where it's coming from). The same naming convention is used on both the central server and the remote computers because the files must be copied from one machine to another and vice versa.
Figure 1b - Naming Convention For Subdirectories And Files
|
The SAME subdirectory names are used on BOTH the central server and remote computers:
     c:\test\SITEnnnn\CONSOL.xxx - To Remote Site nnnn - From Consolidated DB
     c:\test\CONSOL\SITEnnnn.xxx - To Consolidated DB  - From Remote Site nnnn
Here's how the files are exchanged between DBREMOTW and DBREMOTE:
         Remote Computer                            Central Server
===================================      ===================================
             \SITEnnnn subdirectory      \SITEnnnn subdirectory
DBREMOTW <---   CONSOL.xxx files   <----    CONSOL.xxx files   <-------.
    |                                                                  |
    |        \CONSOL subdirectory        \CONSOL subdirectory          |
    '------->   SITEnnnn.xxx files ---->    SITEnnnn.xxx files ---> DBREMOTE
|
These names are closely related to replication user ids in this demonstration. The whole business of user ids and file and directory names is very important and often confusing. It will be explained further when user ids are defined in Figures 2b and 5c. For another view of the naming conventions have a look at Figure 5e.
Step 2 - Run DBINIT, DBSRV50 and ISQL to set up the consolidated database (required).
The following DOS commands create and initialize the consolidated database on the central server:
DBINIT -p 4096 c:\test\consol.db DBSRV50 -c 4096K -nconsol -xNamedPipes c:\test\consol.db ISQL -c "DBN=consol;UID=DBA;PWD=SQL" READ c:\test\cretabs.sql ISQL -c "DBN=consol;UID=DBA;PWD=SQL" READ c:\test\creusers.sql ISQL -c "DBN=consol;UID=DBA;PWD=SQL" READ c:\test\crepubs.sql ISQL -c "DBN=consol;UID=DBA;PWD=SQL" READ c:\test\credata.sql |
DBINIT creates the CONSOL.DB and CONSOL.LOG files using the following parameters:
DBSRV50 starts the server and the database using the following parameters:
Figure 2a shows the CREATE TABLE statements processed by the first ISQL command above. The replication1 table is updated on the central server and published to all remote clients for read-only purposes. The DEFAULT AUTOINCREMENT column unique_id1 serves as a simple primary key.
Figure 2a - CRETABS.SQL - Create The Tables On The Consolidated Database
(This file is contained in rep.zip.)
IF EXISTS ( SELECT * FROM sys.systable
             WHERE table_name = 'replication1'
      AND table_type = 'BASE' ) THEN
   DROP TABLE replication1;
END IF;

CREATE TABLE replication1
   ( unique_id1       INTEGER   DEFAULT AUTOINCREMENT NOT NULL,
     subscription_id1 CHAR(100) NOT NULL,
     numeric_data1    INTEGER   NOT NULL,
     string_data1     CHAR(100) NOT NULL,
     PRIMARY KEY ( unique_id1 ) );

IF EXISTS ( SELECT * FROM sys.systable
             WHERE table_name = 'replication2'
      AND table_type = 'BASE' ) THEN
   DROP TABLE replication2;
END IF;

CREATE TABLE replication2
   ( unique_id2       INTEGER   DEFAULT AUTOINCREMENT NOT NULL,
     creator_id2      CHAR(100) DEFAULT CURRENT PUBLISHER NOT NULL,
     subscription_id2 CHAR(100) NOT NULL,
     numeric_data2    INTEGER   NOT NULL,
     string_data2     CHAR(100) NOT NULL,
     PRIMARY KEY ( unique_id2, creator_id2 ) );

IF EXISTS ( SELECT * FROM sys.systable
             WHERE table_name = 'replication3'
      AND table_type = 'BASE' ) THEN
   DROP TABLE replication3;
END IF;

CREATE TABLE replication3
   ( unique_id3       INTEGER   DEFAULT AUTOINCREMENT NOT NULL,
     creator_id3      CHAR(100) DEFAULT CURRENT PUBLISHER NOT NULL,
     subscription_id3 CHAR(100) NOT NULL,
     numeric_data3    INTEGER   NOT NULL,
     string_data3     CHAR(100) NOT NULL,
     PRIMARY KEY ( unique_id3, creator_id3 ) );
|
The other tables replication2 and replication3 are updated on both the central server and remote clients. To handle the situation where the DEFAULT AUTOINCREMENT column unique_id2 is assigned the same value on two different computers, the DEFAULT CURRENT PUBLISHER column creator_id2 is included the primary key. This prevents duplicates because each database uses a different publisher id. The same is true for unique_id3 and creator_id3 in the replication3 table.
Tip: SQL Remote user ids are really database ids.
Figure 2b shows how replication-related user ids are set up on the consolidated database by the second ISQL command. These ids are only used by utility programs for replication purposes so they are given only CONNECT, REMOTE DBA, REMOTE and PUBLISH privileges. The special values "consol" (for "consolidated") and "sitennnn" are used because they serve to identify databases or computers rather than people.
Figure 2b - CREUSERS.SQL - Set Up Replication-Related User Ids On The Consolidated Database
(This file is contained in rep.zip.)
/* Create remote message address */ CREATE REMOTE MESSAGE TYPE FILE ADDRESS 'consol'; /* Create userids with PUBLISH and REMOTE */ GRANT CONNECT TO consol IDENTIFIED BY consol; GRANT REMOTE DBA TO consol; GRANT PUBLISH TO consol; GRANT CONNECT TO site0001 IDENTIFIED BY site0001; GRANT REMOTE DBA TO site0001; GRANT REMOTE TO site0001 TYPE FILE ADDRESS 'site0001'; GRANT CONNECT TO site0002 IDENTIFIED BY site0002; GRANT REMOTE DBA TO site0002; GRANT REMOTE TO site0002 TYPE FILE ADDRESS 'site0002'; // ...etc., for other remote sites |
The CREATE REMOTE MESSAGE TYPE statement does two things: it specifies "FILE" as the messaging system to be used, and it specifies "consol" as the return address for messages. Here's how you can interpret the ADDRESS 'consol' clause: Use C:\TEST\CONSOL as the subdirectory on the central server to hold messages that are being sent to the consolidated database from the remote database. In other words, ADDRESS 'consol' specifies the return address for the publisher.
The GRANT REMOTE TO sitennnn commands also have two purposes: to (redundantly?) specify "FILE" as the messaging system, and to define C:\TEST\SITEnnnn as the subdirectory on the central server to hold messages that are being sent to the remote database from the consolidated database.
To keep things simple the same values have been chosen for user ids and subdirectory names: consol and sitennnn. It doesn't have to be that way (simple, that is) which is why this point is being beaten to death. For more information, have a look at the file and naming conventions in Figure 1b, and the RELOAD.SQL file in Figure 5c.
Tip: GRANT REMOTE DBA is hard to find in the Help but it's worth looking for.
The GRANT REMOTE DBA statements make it possible to run DBREMOTE without granting full DBA permissions.
Tip: Use SUBSCRIBE BY instead of WHERE to send different rows to different subscribers.
Figure 2c shows how the publications and subscriptions are set up by the third ISQL command. Rows in replication1 are published to everyone reas rows in replication2 and replication3 are sent to different sites according to the values in subscription_id2 and subscription_id3. The only real difference between replication2 and replication3 is that separate publications controlled by WHERE clauses are used for replication2 whereas a single publication with a SUBSCRIBE BY clause is all that's needed for replication3.
Figure 2c - CREPUBS.SQL - Set Up The Publications And Subscriptions On The Consolidated Database
(This file is contained in rep.zip.)
/* A simple everyone-subscribes publication */

IF EXISTS ( SELECT * FROM sys.syspublications
             WHERE publication_name = 'pub1' ) THEN
   DROP PUBLICATION pub1;
END IF;

CREATE PUBLICATION pub1
   ( TABLE replication1 );
CREATE SUBSCRIPTION TO pub1 FOR site0001;
CREATE SUBSCRIPTION TO pub1 FOR site0002;

/* Publication-subscription pairs matched via WHERE clauses */

IF EXISTS ( SELECT * FROM sys.syspublications
    WHERE publication_name = 'pub2_sub1' ) THEN
   DROP PUBLICATION pub2_sub1;
END IF;

CREATE PUBLICATION pub2_sub1
   ( TABLE replication2
     WHERE subscription_id2 = 'Sub1' );
CREATE SUBSCRIPTION TO pub2_sub1 FOR site0001;

IF EXISTS ( SELECT * FROM sys.syspublications
             WHERE publication_name = 'pub2_sub2' ) THEN
   DROP PUBLICATION pub2_sub2;
END IF;

CREATE PUBLICATION pub2_sub2
   ( TABLE replication2
     WHERE subscription_id2 = 'Sub2' );
CREATE SUBSCRIPTION TO pub2_sub2 FOR site0002;

// ...a publication/subscription pair is required for each additional remote site.

/* A single publication with multiple subscriptions matched via SUBSCRIBE BY */

IF EXISTS ( SELECT * FROM sys.syspublications
             WHERE publication_name = 'pub3' ) THEN
   DROP PUBLICATION pub3;
END IF;

CREATE PUBLICATION pub3
   ( TABLE replication3
     SUBSCRIBE BY subscription_id3 );
CREATE SUBSCRIPTION TO pub3 ( 'Sub1' ) FOR site0001;
CREATE SUBSCRIPTION TO pub3 ( 'Sub2' ) FOR site0002;

// ...only one subscription needed for each additional remote site.
|
START SUBSCRIPTION commands are not required in Figure 2c because DBXTRACT will automatically start subscriptions by default.
Tip: Don't use one column for two different purposes.
Experience has shown that life is good when each column is only used for a single purpose. That is especially true for non-trivial replication applications and that is why publications in this example aren't being controlled by user ids. Instead, control over which rows are replicated to which databases is handled by separate application-maintained columns called subscription_idx. The unique_idx and creator_idx columns are used only to guarantee unique primary keys.
This arrangement has certain advantages:
The subscription_id1 column isn't used in Figure 2c because it isn't needed for the unqualified publication pub1. The column is included in replication1 simply for future enhancements: at some point qualified subscriptions to this table may be required.
Tip: Don't define vertical subsets.
Maintenance is easier if all columns are replicated. It's OK to define horizontal subsets (selected rows) but try to avoid vertical subsets where specific columns are named in the CREATE PUBLICATION TABLE clauses.
Figure 2d shows the data loaded onto the consolidated database by the fourth ISQL command. No values are provided for the primary key columns because they are filled by default. The other columns are filled as follows:
Figure 2d - CREDATA.SQL - Some Initial Load Data For The Consolidated Database
(This file is contained in rep.zip.)
TRUNCATE TABLE replication1; TRUNCATE TABLE replication2; TRUNCATE TABLE replication3; INSERT INTO replication1 ( subscription_id1, numeric_data1, string_data1 ) VALUES ( 'Main', 0, 'initial test' ); INSERT INTO replication2 ( subscription_id2, numeric_data2, string_data2 ) VALUES ( 'Sub1', 0, 'initial test' ); INSERT INTO replication2 ( subscription_id2, numeric_data2, string_data2 ) VALUES ( 'Sub2', 0, 'initial test' ); INSERT INTO replication3 ( subscription_id3, numeric_data3, string_data3 ) VALUES ( 'Sub1', 0, 'initial test' ); INSERT INTO replication3 ( subscription_id3, numeric_data3, string_data3 ) VALUES ( 'Sub2', 0, 'initial test' ); |
Step 3 - Make a backup: MAKECBAK 3 and MAKERBAK 3 (optional).
If you make a mistake following this demonstration or you simply want to try something different without going all the way back to Step 1, you might want to be able to restore the databases. That's what these "Step X - Make a backup" instructions are all about.
If you don't want to bother with backups, just skip this step and all the other ones like it.
Recovery processing in a replication setup is vastly more complicated and dangerous than for a single database, even if that database has many users. That's because the "current state" of a single database is simply defined by its .DB and .LOG files whereas the current state of a replication setup is determined by many different .DB and .LOG files on different computers plus all those message files travelling between sites.
Real-world replication recovery is beyond the scope of this demonstration. What's being used here is a brute force technique that is only practical in a test environment. Every time a backup is taken, all the database and message files on all the computers are backed up. And whenever a restore is done, all those files are restored, wherever they are, whether they've changed or not.
Here's an overview of how this "snapshot" backup and restore processing works:
     c:\test\makecbak 3
     c:\test\makerbak 3
The two commands above should always be run together. Some files don't exist this early in the demonstration so you will see some "file not found" errors; it is safe to ignore these messages.
DBSRV50 -c 4096K -nconsol -xNamedPipes c:\test\consol.db
     c:\test\restcbak 3
     c:\test\restrbak 3
The two commands above should always be run together. Some files
don't exist this early in the demonstration so you will see some "file
not found" errors; it is safe to ignore these messages.
DBSRV50 -c 4096K -nconsol -xNamedPipes c:\test\consol.db
Figures 3a, 3b, 3c and 3d show the four batch files used for backups and restores.
Figure 3a - MAKECBAK.BAT - Make A Backup Of The Central Server Files
(This file is contained in rep.zip.)
if %1z == z goto error1 if %2z == z goto ok1 goto error1 :ok1 pause To MAKE A BACKUP of the central server files to CBAK%1 mkdir c:\test\cbak%1 attrib -r c:\test\cbak%1\consol.db attrib -r c:\test\cbak%1\consol.log erase c:\test\cbak%1\consol.db erase c:\test\cbak%1\consol.log copy c:\test\consol.db c:\test\cbak%1\consol.db copy c:\test\consol.log c:\test\cbak%1\consol.log pause mkdir c:\test\cbak%1\consol erase c:\test\cbak%1\consol\site0001.* copy c:\test\consol\site0001.* c:\test\cbak%1\consol\site0001.* pause mkdir c:\test\cbak%1\site0001 erase c:\test\cbak%1\site0001\consol.* copy c:\test\site0001\consol.* c:\test\cbak%1\site0001\consol.* pause goto end :error1 pause Specify the Step number; e.g.: makecbak 3 :end |
Figure 3b - MAKERBAK.BAT - Make A Backup Of The SITE0001 Remote Computer Files
(This file is contained in rep.zip.)
if %1z == z goto error1 if %2z == z goto ok1 goto error1 :ok1 pause To MAKE A BACKUP of the SITE0001 remote computer files to RBAK%1 mkdir c:\test\rbak%1 attrib -r c:\test\rbak%1\remote.db attrib -r c:\test\rbak%1\remote.log erase c:\test\rbak%1\remote.db erase c:\test\rbak%1\remote.log copy f:\test\remote.db c:\test\rbak%1\remote.db copy f:\test\remote.log c:\test\rbak%1\remote.log pause mkdir c:\test\rbak%1\consol erase c:\test\rbak%1\consol\site0001.* copy f:\test\consol\site0001.* c:\test\rbak%1\consol\site0001.* pause mkdir c:\test\rbak%1\site0001 erase c:\test\rbak%1\site0001\consol.* copy f:\test\site0001\consol.* c:\test\rbak%1\site0001\consol.* pause goto end :error1 pause Specify the Step number; e.g.: makerbak 3 :end |
Figure 3c - RESTCBAK.BAT - Restore Files On The Central Server
(This file is contained in rep.zip.)
if %1z == z goto error1 if %2z == z goto ok1 goto error1 :ok1 pause To RESTORE FILES on the central server from CBAK%1 attrib -r c:\test\consol.db attrib -r c:\test\consol.log erase c:\test\consol.db erase c:\test\consol.log copy c:\test\cbak%1\consol.db c:\test\consol.db copy c:\test\cbak%1\consol.log c:\test\consol.log pause erase c:\test\consol\site0001.* copy c:\test\cbak%1\consol\site0001.* c:\test\consol\site0001.* pause erase c:\test\site0001\consol.* copy c:\test\cbak%1\site0001\consol.* c:\test\site0001\consol.* pause goto end :error1 pause Specify the Step number; e.g.: restcbak 3 :end |
Figure 3d - RESTRBAK.BAT - Restore Files To The SITE0001 Remote Computer
(This file is contained in rep.zip.)
if %1z == z goto error1 if %2z == z goto ok1 goto error1 :ok1 pause To RESTORE FILES to the SITE0001 remote computer from RBAK%1 attrib -r f:\test\remote.db attrib -r f:\test\remote.log erase f:\test\remote.db erase f:\test\remote.log copy c:\test\rbak%1\remote.db f:\test\remote.db copy c:\test\rbak%1\remote.log f:\test\remote.log pause erase f:\test\consol\site0001.* copy c:\test\rbak%1\consol\site0001.* f:\test\consol\site0001.* pause erase f:\test\site0001\consol.* copy c:\test\rbak%1\site0001\consol.* f:\test\site0001\consol.* pause goto end :error1 pause Specify the Step number; e.g.: restrbak 3 :end |
Step 4 - Show the replication status after the consolidated database is set up (optional).
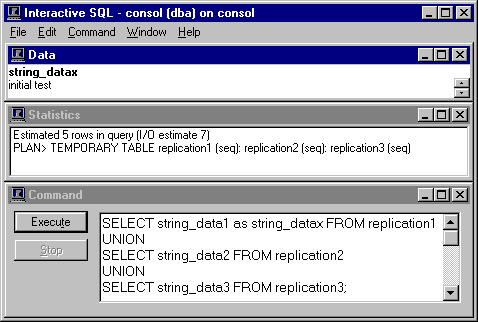
Figure 4a shows a simple SELECT that can be loaded and executed via ISQL or ISQLW to summarize the data on any of the databases. It does this by displaying all the different values stored in the string_datax columns. These columns are being used throughout this demonstration to answer the question "When did this row get inserted?" as shown in Figures 2d, 14a, and so on.
Figure 4a - SELDATA.SQL - Summarize The Current Database Status
(This file is contained in rep.zip.)
SELECT string_data1 as string_datax FROM replication1 UNION SELECT string_data2 FROM replication2 UNION SELECT string_data3 FROM replication3; |
How to run SQL files via ISQL and ISQLW
     DBSRV50 -c 4096K -nconsol -xNamedPipes c:\test\consol.db
     ISQL -c "DBN=consol;UID=DBA;PWD=SQL"
ISQLW -c "DBF=c:\test\remote.db;UID=DBA;PWD=SQL"
You can use SELDATA.SQL to confirm changes that have been made directly to a database and changes that have arrived from another database. Figure 4b shows that rows marked "initial test" now exist on the consolidated database.
Figure 4b - SELDATA.SQL Via ISQL Shows The Current Status Of The Consolidated Database
The SQL Anywhere catalog contain several tables dedicated to replication, one of which is particularly useful for determining which messages have been sent to and from a particular database. The sys.sysremoteuser table and it's corresponding formatted view sysremoteusers contain one row per database pair with these helpful columns:
The first 4 columns uniquely identify messages by using a strange but clever value: the position in the physical .LOG file where the last COMMIT corresponding to this replication message is stored. This works because SQL Anywhere replication is based on committed transactions as recorded in the log files, and the log files contain a sequential record of those transactions.
The different sysremoteuser columns use the position in different log files as follows:
The sysremoteuser table exists at both ends of the replication link, on both the remote and consolidated databases. For this demonstration each remote database contains a single row in sysremoteuser corresponding to the consolidated database. Conversely, sysremoteuser table in the consolidated database contains one row for each remote database.
In other words, each row in sysremoteuser contains information about the message link between "this database" and "the other database". The other database is identified by the user_name column:
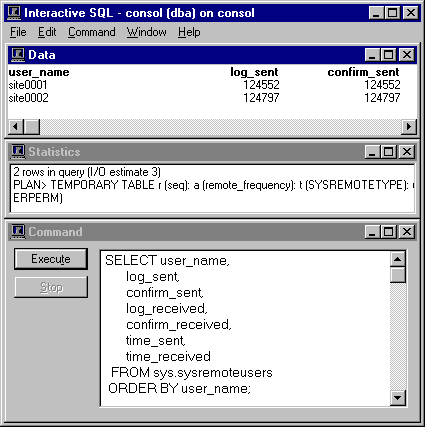
Figure 4c shows a SELECT statement you can use to display the current contents of sys.sysremoteusers.
Figure 4c - SYSREMO.SQL - Display Current Contents Of SYSREMOTUSERS
(This file is contained in rep.zip.)
SELECT user_name,
       log_sent,
       confirm_sent,
       log_received,
       confirm_received,
       time_sent,
       time_received
  FROM sys.sysremoteusers
 ORDER BY user_name;
|
Figure 4d shows what sysremoteusers looks like on the consolidated database at this point in the demonstration. The values in log_sent and confirm_sent don't mean anything because no messages have been sent yet.
Figure 4d - SYSREMO.SQL Via ISQL Shows SYS.SYSREMOTEUSERS On The Consolidated Database
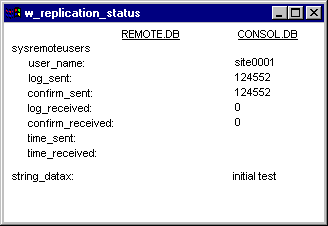
The full picture of replication status requires SELDATA.SQL and SYSREMO.SQL each to be run twice, once on the consolidated database and again on at least one remote database. The REPSTAT.EXE program makes this easier by gathering and displaying all the data in one step as shown in Figure 4e.
Figure 4e - Replication Status After The Consolidated Database Is Set Up
(This file is contained in rep.zip.)
The Replication Status program is provided in two forms: an Windows NT executable PowerBuilder 5 program called REPSTAT.EXE and the corresponding source code in REPSTAT.PBL as shown in Figure 4f.
Figure 4f - Contents Of REPSTAT.PBL
(This file is contained in rep.zip.)
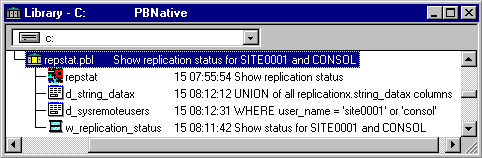
The Replication Status program is based on four DataWindow controls using 2 DataWindow objects in the w_replication_status window. All the program code is in the window open script shown in Figure 4g.
Figure 4g - Window Open Script From W_Replication_Status In REPSTAT.PBL
transaction ltr_remote transaction ltr_consol integer li_RC long ll_row_count // Connect to consol.db on the central server. ltr_consol = create transaction ltr_consol.DBMS = "ODBC" ltr_consol.DBParm = "ConnectString='DSN=consol;UID=DBA;PWD=SQL'" CONNECT USING ltr_consol; IF ltr_consol.SQLCode <> 0 THEN MessageBox ( "Error", "Connect ltr_consol failed" ) END IF // Get sysremoteusers columns from consol.db. li_RC = dw_sysremoteusers_consol.SetTransObject ( ltr_consol ) IF li_RC <> 1 THEN MessageBox ( "Error", "SetTransObject dw_sysremoteusers_consol failed" ) END IF ll_row_count = dw_sysremoteusers_consol.Retrieve ( "site0001" ) IF ll_row_count < 0 THEN MessageBox ( "Error", "Retrieve dw_sysremoteusers_consol failed" ) END IF // Get string_datax columns from consol.db. li_RC = dw_string_datax_consol.SetTransObject ( ltr_consol ) IF li_RC <> 1 THEN MessageBox ( "Error", "SetTransObject dw_string_datax_consol failed" ) END IF ll_row_count = dw_string_datax_consol.Retrieve() IF ll_row_count < 0 THEN MessageBox ( "Error", "Retrieve dw_string_datax_consol failed" ) END IF DISCONNECT USING ltr_consol; IF ltr_consol.SQLCode <> 0 THEN MessageBox ( "Error", "Disconnect ltr_consol failed" ) END IF // Connect to remote.db on the SITE0001 remote computer. ltr_remote = create transaction ltr_remote.DBMS = "ODBC" ltr_remote.DBParm = "ConnectString='DSN=remote;UID=DBA;PWD=SQL'" CONNECT USING ltr_remote; IF ltr_remote.SQLCode <> 0 THEN MessageBox ( "Error", "Connect ltr_remote failed" ) END IF // Get sysremoteusers columns from remote.db. li_RC = dw_sysremoteusers_remote.SetTransObject ( ltr_remote ) IF li_RC <> 1 THEN MessageBox ( "Error", "SetTransObject dw_sysremoteusers_remote failed" ) END IF ll_row_count = dw_sysremoteusers_remote.Retrieve ( "consol" ) IF ll_row_count < 0 THEN MessageBox ( "Error", "Retrieve dw_sysremoteusers_remote failed" ) END IF // Get string_datax columns from remote.db. li_RC = dw_string_datax_remote.SetTransObject ( ltr_remote ) IF li_RC <> 1 THEN MessageBox ( "Error", "SetTransObject dw_string_datax_remote failed" ) END IF ll_row_count = dw_string_datax_remote.Retrieve() IF ll_row_count < 0 THEN MessageBox ( "Error", "Retrieve dw_string_datax_remote failed" ) END IF DISCONNECT USING ltr_remote; IF ltr_remote.SQLCode <> 0 THEN MessageBox ( "Error", "Disconnect ltr_remote failed" ) END IF |
The DataWindows used by REPSTAT.EXE are based on SQL SELECTs that are almost identical to SELDATA.SQL and SYSREMO.SQL.
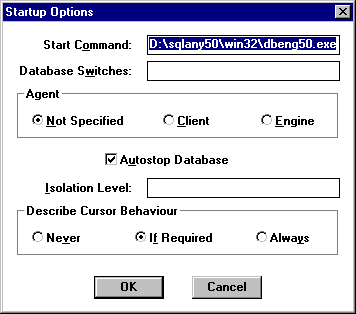
Figures 4h, 4i, 4j and 4k show the two ODBC data source definitions used by the script in Figure 4g Both of these data sources are set up on the central server because that's where REPSTAT.EXE runs, not on the remote computer.
Here's how ODBC setup works on Window NT4:
These data sources work if the consolidated database is already started by this command from Step 2:
DBSRV50 -c 4096K -nconsol -xNamedPipes c:\test\consol.db
The REMOTE data source in Figures 4j and 4k uses the shared drive letter F: to get to the SITE0001 remote database.
Figure 4h - Configure ODBC Data Source "CONSOL" On The Central Server
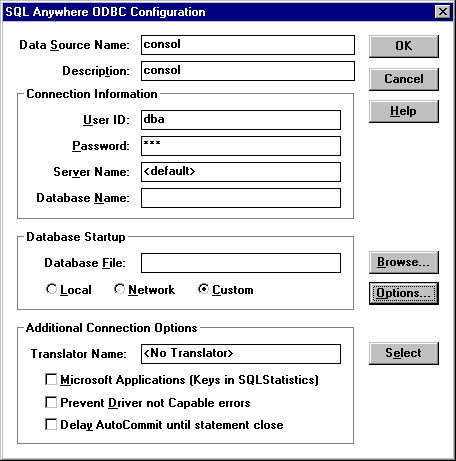
Figure 4i - Startup Options For ODBC Data Source "CONSOL" On The Central Server
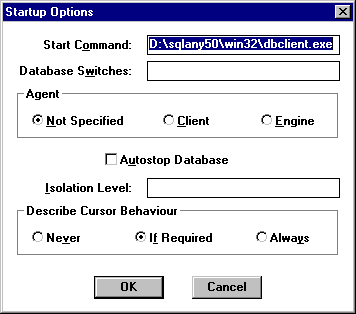
Figure 4j - Configure ODBC Data Source "REMOTE" On The Central Server
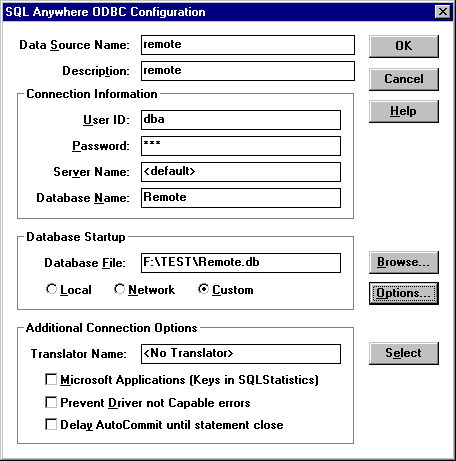
Figure 4k - Startup Options For ODBC Data Source "REMOTE" On The Central Server
This is the end of Section One. The consolidated database has been set up, as well as procedures for backup, restore and replication status display. The system is now ready for the remote databases to be set up.
| [Home] | [Table of Contents] | [Previous Section] | [Next Section] |