Foxhound is the better* Database Monitor for SQL Anywhere.
*better: More thorough, more relevant, more effective.
...more Alerts, more All Clears, more details, more control in your hands.


[Home] [Back to Tip 83] [Forward to Tip 85] [Archives]
Breck Carter
Last modified: December 2, 1998
mail to: bcarter@bcarter.com


Tip 84: Java In The Database (4)
JDBC and jConnect

Question: Can Java code do Adaptive Server Anywhere database I/O from a client?

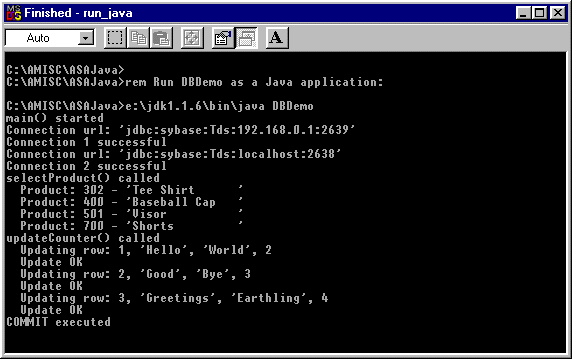
Yes, via JDBC and the Sybase jConnect driver. Figure 1 shows the output from a standalone Java application that connects to ASA databases running on two different machines, retrieving data from one and updating the other.

Figure 1: DBDemo Output Figure 1: DBDemo Output

Figure 2 shows the code for the standalone Java application DBDemo.java. Each section of code is numbered 1, 2, 3, .., and explained in the text that follows Figure 2. You can click on the highlighted links to jump back and forth between Figure 2 and the explanations.

Figure 2: DBDemo.java Client Application
import java.sql.*;             // JDBC
import com.sybase.jdbc.*;      // Sybase jConnect
import java.util.Properties;   // Properties
import sybase.sql.*;           // Sybase utilities
import HelloWorld;             // Used in the table

public class DBDemo{
  
  private static Connection connection1;
  private static Connection connection2;

  public static void main( String args[] ){

    System.out.println( "main() started" );

    // 1. Connect to a remote server.

    connection1 = getASAConnection
      ( "192.168.0.1", "2639", "dba", "sql" );

    if ( connection1 != null ) {
      System.out.println( "Connection 1 successful" );
    } else {
      System.out.println( "Connection 1 failed" );
    }

    // 2. Connect to a local server.

    connection2 = getASAConnection
      ( "localhost", "2638", "dba", "sql" );

    if( connection2 != null ) {
      System.out.println( "Connection 2 successful" );
    }else{
      System.out.println( "Connection 2 failed" );
    }

    // 3. Perform SQL operations via the two connections.

    try {
      selectProduct ( connection1 );
      updateCounter ( connection2 );
    }
    catch ( Exception exception ) {
      System.out.println( "Error: " + exception.getMessage() );
      exception.printStackTrace();
    }  

  } // main()

  private static Connection getASAConnection
    ( String machine,
      String port,
      String userID, 
      String password ) {

    Connection connection;
    String     url;
    Properties properties;

    // 4. Prepare arguments for getConnection().

    connection = null;
    url        = "jdbc:sybase:Tds:" + machine + ":" + port;
    properties = new Properties();
    properties.put ( "user", userID );
    properties.put ( "password", password );

    // 5. Load the jConnect driver and make a connection.

    try {
      Class.forName ( "com.sybase.jdbc.SybDriver" )
        .newInstance();
      connection = DriverManager.getConnection 
        ( url, properties );
      connection.setAutoCommit( false ) ;
    }
    catch ( Exception exception ) {
      System.out.println ( "Error: " + exception.getMessage() );
      exception.printStackTrace();
    }

    // 6. Return the connection to the caller.

    System.out.println ( "Connection url: '" + url + "'" );
    return connection;
  } // getASAConnection()

  private static void selectProduct
    ( Connection connection ) throws Exception {

    Statement         selectStatement;
    ResultSet         resultSet;
    int               localId;
    String            localName;

    System.out.println ( "selectProduct() called" );

    if ( connection != null ) {

      // 7. Execute SELECT to get a result set.

      selectStatement = connection.createStatement();
      resultSet = selectStatement.executeQuery
        ( "SELECT id, "
        + "       name "
        + "  FROM product " 
        + " WHERE color = 'Black' " );
      
      while ( resultSet.next() ) {

        // 8. Get and display the columns.

        localId   = resultSet.getInt ( "id" );
        localName = resultSet.getString ( "name" );
        System.out.println
          ( "  Product: " + localId + " - '"
            + localName + "'" );

      } // while ( resultSet.next() )
    } // if ( connection != null )
  } // selectProduct()

  private static void updateCounter
    ( Connection connection ) throws Exception {

    String            updateSQL;
    PreparedStatement updateStatement;
    Integer           updateCount;
    Statement         selectStatement;
    ResultSet         resultSet;
    byte              byteArray[]; 
    int               localPKey;
    HelloWorld        localJHelloWorld;
    int               localCounter;
    String            endSQL;
    Statement         endStatement;

    System.out.println ( "updateCounter() called" );

    if ( connection != null ) {

      // 9. Prepare UPDATE for later execution.

      updateSQL 
        = "UPDATE java_hello_world "
        + "   SET JHelloWorld = EVALUATE " 
        + "         ( JHelloWorld.setCounter ( ? ), "
        + "           JHelloWorld ) "
        + " WHERE pkey = ? ";
      updateStatement = connection.prepareStatement 
        ( updateSQL );

      // 10. Execute SELECT to get a result set.

      selectStatement = connection.createStatement();
      resultSet = selectStatement.executeQuery
        ( "SELECT pkey, "
        + "       sybase.sql.ASAUtils.toByteArray ( JHelloWorld ) "
        + "         AS serializedJHelloWorld "
        + "  FROM java_hello_world " );
      
      while ( resultSet.next() ) {

        // 11. Get the columns into local variables.

        localPKey = resultSet.getInt ( "pkey" );
        byteArray = resultSet.getBytes ( "serializedJHelloWorld" );
        localJHelloWorld = (HelloWorld)sybase.sql.ASAUtils
          .fromByteArray( byteArray );

        // 12. Change the counter field.

        localCounter = localJHelloWorld.counter.intValue() + 1;
        System.out.println
          ( "  Updating row: " + localPKey + ", '"
            + localJHelloWorld.hello    + "', '"
            + localJHelloWorld.world    +  "', "
            + localCounter );

        // 13. Fill in and execute the prepared update.

        updateStatement.setInt ( 1, localCounter );
        updateStatement.setInt ( 2, localPKey );
        updateCount = new Integer 
          ( updateStatement.executeUpdate() );

        // 14. Check the update, and rollback and exit if necessary.

        if ( updateCount.intValue() == 1 ) {
          System.out.println ( "  Update OK" );
        } else {
          System.out.println ( "  Update failed" );
          endSQL = "ROLLBACK ";
          endStatement = connection.createStatement();
          endStatement.executeUpdate ( endSQL );
          System.out.println ( "ROLLBACK executed" );
          return;
        }
      } // while ( resultSet.next() )

    // 15. Commit the changes.

    endSQL = "COMMIT ";
    endStatement = connection.createStatement();
    endStatement.executeUpdate ( endSQL );
    System.out.println( "COMMIT executed" );

    } // if ( connection != null )
  } // updateCounter()

} // class DBDemo

1. Connect to a remote server.

The getASAConnection method uses a machine address 192.168.0.1, server port number 2639, and a user id and password to connect to a server. It returns a value of type java.sql.Connection which is assigned to the variable called connection1. The inner workings of getASAConnection are described in Section 4 below.

The machine address used here is the specific IP address of a separate computer. Other values may be used, such as localhost for the current computer, or something like DELL180 if it appears in the c:\windows\hosts file.

The port number is the one specified in the -x tcpip{ServerPort=2639} parameter used when the database server was started on that computer. The default port number is 2638, and there is usually no need to use a different value unless two servers are being started on the same computer. Explicit port numbers are used here simply to show how it's done.

More information about TCP/IP settings and server command lines may be found in the Appendix below.

2. Connect to a local server.

The second call to geASAConnection shows that a Java program may connect to more than one server at a time. Here, the machine address is localhost for the current computer, and the server port number is the default.

3. Perform SQL operations via the two connections.

The call to the selectProduct method demonstrates how a simple SELECT can be performed against a remote database. See Section 7 below for more details.

The call to updateCounter shows how data can be retrieved and updated on a local database. See Section 9 below for more details.

4. Prepare arguments for getConnection().

The getASAConnection method first fills in some values required for making a connection:

  • The connection parameter is initialized to null to allow later error checking.

  • The url string is set to a value like "jdbc:sybase:Tds:192.168.0.1:2639" to identify the database server.

  • The properties object gets two name-and-value pairs for the user id and password.

5. Load the jConnect driver and make a connection.

The strange Class.forName ( "com.sybase.jdbc.SybDriver" ).newInstance() call is the recommended way to load the Sybase jConnect driver. Don't ask, don't tell... that's my motto; let's just say some topics are lightly treated in the documentation.

The call to DriverManager.getConnection makes the actual connection to the server, and the setAutoCommit( false ) call allows program control of COMMIT and ROLLBACK logic.

For more information about connections and related topics, have a look at the following topics in the ASA 6 Help:

  • java.sql.Connection
  • java.util.Properties
  • java.sql.DriverManager

6. Return the connection to the caller.

The last thing getASAConnection does is return the initialized connection object to the caller, where it is saved in connection1 or connection2 (see Section 1 and Section 2).

7. Execute SELECT to get a result set.

The selectProduct method executes a simple SQL SELECT by using an object of type Statement (see java.sql.Statement in the Help). First, the Statement object is created with connection's createStatement method, then it is both filled in and executed by its own executeQuery method:

     SELECT id,
            name 
       FROM product 
      WHERE color = 'Black'

The call to executeQuery returns a result set in an object of type ResultSet (see java.sql.ResultSet in the Help). The ResultSet's next method moves to the first row in the result set, then the second row, and so on, returning true until there are no more rows.

This whole mechanism works very much like a cursor fetch loop in other languages. Java does make you work harder to actually get data out of the result set, however, because there is no concept of "FETCH INTO".

8. Get and display the columns.

The ResultSet class has over three dozen methods for extracting actual data. This code uses only two: getInt to retrieve the product.id value, and getString to get product.name.

9. Prepare UPDATE for later execution.

The updateCounter method is much more ambitious than selectProduct: it both retrieves and updates data, and it works with a table that contains a Java object column.

Because the SQL UPDATE statement is going to contain two substitution values, a "prepared statement" is used instead of a simple statement (see java.sql.PreparedStatement in the Help).

Question marks "?" are used in the SQL command as placeholders for the substitution values, and the connection's prepareStatement method is used instead of createStatement.

Because UPDATE commands can only specify column names in the SET clause, only whole Java columns can be updated rather than fields inside the objects. ASA 6 provides the new SQL EVALUATE function to overcome that obstacle. All the arguments to EVALUATE are evaluated (executed), and the final argument is used as the return value from EVALUATE itself.

In this program only the JHelloWorld.counter field is to be changed. A method called setCounter exists in the HelloWorld class for the purposes of setting the counter value, and that method is called as the first argument to EVALUATE. The last argument is a reference to the JHelloWorld column itself.

In other words, the SET clause may be read as "call setCounter to change JHelloWorld.counter, then SET JHelloWorld = JHelloWorld":

     SET JHelloWorld = EVALUATE  
                        ( JHelloWorld.setCounter ( ? ), 
                          JHelloWorld )
For a complete definition of the HelloWorld class and the java_hello_world table see Figure 3 and Figure 4).

10. Execute SELECT to get a result set.

The SELECT statement is used in cursor fetch loop like the one described earlier (see Section 7). The createStatement, executeQuery and next methods are all called to process an object of type ResultSet.

This code is more interesting, however, because a Java object column is being retrieved. Somehow the JHelloWorld object must cross the JDBC/jConnect boundary from the database to the program. In theory, ASA 6 and the application could be running on two different platforms, with different byte orders and other incompatibilities.

Put simply the JHelloWorld column must be converted to a stream of bytes by a call to toByteArray in the SELECT statement, and (in the next section) reconstituted as a JHelloworld object by a call to fromByteArray in the Java program.

This process is called serialization and is described in the later section A Serializable Version of HelloWorld.

11. Get the columns into local variables.

The column java_hello_world.pkey is extracted from the result set by a call to getInt.

The byte stream corresponding to java_hello_world.JHelloWorld is extracted via getBytes and then converted (deserialized) to an object of type HelloWorld by a call to fromByteArray.

12. Change the counter field.

The localCounter variable is used to hold the new value for the java_hello_world.JHelloWorld >> counter field.

13. Fill in and execute the prepared update.

Two calls to setInt fill in the "?" substitution values in the UPDATE statement, and the executeUpdate method is used to run it.

14. Check the update, and rollback and exit if necessary.

If the executeUpdate call returned a row count other than 1, a ROLLBACK is executed via calls to createStatement and executeUpdate.

15. Commit the changes.

After the while loop terminates, a COMMIT is executed via calls to createStatement and executeUpdate.

A Serializable Version of HelloWorld

A class is serializable if it contains "implements java.io.Serializable" in the class header.

An object is serialized when it is turned from its original internal storage layout into a series of bytes that can be treated as just that, a simple data stream.

An object is deserialized when it is turned from a series of bytes back into a real object.

Serialization allows the passing of objects across boundaries. For example, an object can be serialized by a Java program running on one operating system, sent across the network as a simple stream of data, and then magically deserialized (turned back into an object) by a Java program running on a different operating system.

With Java and ASA, serialization allows objects to pass back and forth across the SQL boundary. SQL queries might look like they handle complex Java classes but they really only deal with standard data types. For example, if you execute "SELECT java_column" in ISQL, where java_column is a multi-field Java object, the toString() method is called to convert the whole thing into a string.

If you execute "SELECT java_column INTO host_variable" in a client programming language, the host variable would receive a string containing whatever toString() decided to put there.

Figure 3 shows the serializable version of the HelloWorld object first introduced back in Tip 81 - Getting Started. The clause implements java.io.Serializable makes it possible for the DBDemo application to use a technique other than toString to retrieve Java object columns.

Figure 3: Serializable Version of HelloWorld.java
public class HelloWorld implements java.io.Serializable {
  
  public String hello ;
  public String world ;
  public java.lang.Integer counter ;

  HelloWorld () {                // Constructor 1
    hello = "Hello";
    world = "World";
    counter = new java.lang.Integer ( 1 );
  }

  HelloWorld ( String inHello,   // Constructor 2
               String inWorld,
               int inCounter
             ) {
    hello = inHello;
    world = inWorld;
    counter = new java.lang.Integer ( inCounter );
  }

  public boolean setCounter      // Access Method 
      ( int newCounter ) {
    counter = new java.lang.Integer ( newCounter );
    return true;
  }

  public String toString() {
    return hello + " " + world + ": " + counter.toString();
  }

  public int compareTo( HelloWorld anotherHelloWorld ) {

    // Compare first on the basis of counter
    // and then on the basis of toString()

    java.lang.Integer lVal = counter;
    java.lang.Integer rVal = anotherHelloWorld.counter;

    if ( lVal.intValue() > rVal.intValue() ) {
      return 1;
    }
    else if (lVal.intValue() < rVal.intValue() ) {
      return -1;
    }
    else {
      return toString().compareTo( anotherHelloWorld.toString() );
    }
  }
}

Figure 4: Create and Load java_hello_world Table
INSTALL JAVA NEW FROM FILE 
   'c:\\amisc\\ASAJava\\HelloWorld.class';

CREATE TABLE java_hello_world
   ( pkey              INTEGER NOT NULL,
     JHelloWorld       HelloWorld NOT NULL,
     PRIMARY KEY ( pkey ) );

/* Reverse-order removal:
DROP TABLE java_hello_world;
REMOVE JAVA CLASS HelloWorld;
*/

INSERT INTO java_hello_world ( pkey, JHelloWorld )
   VALUES ( 1, NEW HelloWorld 
               ( 'Hello', 'World', 1 ) );

INSERT INTO java_hello_world ( pkey, JHelloWorld )
   VALUES ( 2, NEW HelloWorld 
               ( 'Good', 'Bye', 2 ) );

INSERT INTO java_hello_world ( pkey, JHelloWorld )
   VALUES ( 3, NEW HelloWorld 
               ( 'Greetings', 'Earthling', 3 ) );

SELECT *
  FROM java_hello_world 
 ORDER BY pkey;

Appendix: TCP/IP Settings and Handy Batch Files

The setup used in this Tip involved a Windows 95 computer where most of the development occurred, plus a separate Windows NT 4 computer connected via Ethernet running TCP/IP. Figure 5 shows the TCP/IP settings, and Figures 6, 7 and 8 show the batch files for launching DBSRV6.EXE on the NT and Windows 95 machines, and for running DBDemo.class.

Here's how the batch files are launched via Start - Run (the same development directory structure was used on both machines):

  • Start asademo.db onthe NT 4 machine:
         c:\amisc\ASAJava\run_dbsrv6_tcpip_NT asademo
    
  • Start asajava.db on the Windows 95 machine:
         c:\amisc\ASAJava\run_dbsrv6_tcpip_95 asajava
    
  • Run DBDemo.class application on the Windows 95 machine:
         c:\amisc\ASAJava\run_java DBDemo
    

See also Tip 82 - Nested Object Columns for some other handy batch files.

Figure 5: TCP/IP Settings
Windows NT setup - IP address  192.168.0.1
                   Subnet mask 255.255.255.0
                   Gateway IP  192.168.0.1
                   Server port 2639

Display produced by Windows NT route print command...

Network Address          Netmask      Gateway    Interface  Metric
        0.0.0.0          0.0.0.0  192.168.0.1  192.168.0.1       1
      127.0.0.0        255.0.0.0    127.0.0.1    127.0.0.1       1
    192.168.0.0    255.255.255.0  192.168.0.1  192.168.0.1       1
    192.168.0.1  255.255.255.255    127.0.0.1    127.0.0.1       1
    192.168.0.2  255.255.255.255  192.168.0.1  192.168.0.1       1
  192.168.0.255  255.255.255.255  192.168.0.1  192.168.0.1       1
      224.0.0.0        224.0.0.0  192.168.0.1  192.168.0.1       1
255.255.255.255  255.255.255.255  192.168.0.1  192.168.0.1       1

Windows 95 setup - IP address  192.168.0.2
                   Subnet mask 255.255.255.0
                   Gateway IP  192.168.0.2
                   Server port 2638

Contents of Windows 95 c:\windows\hosts file...

127.0.0.1   localhost
192.168.0.1 DELL180

Figure 6: run_dbsrv6_tcpip_NT.bat
rem Start - Run Format: c:\amisc\ASAJava
  \run_dbsrv6_tcpip_NT [DBFileName]

rem Define shortcuts for long paths:
SET ASA=F:\Program Files\Sybase\Adaptive Server 
  Anywhere 6.0\win32
SET DB=F:\Program Files\Sybase\Adaptive Server 
  Anywhere 6.0
SET DEV=c:\amisc\ASAJava

rem Move to the development directory:
c:
cd "%DEV%"

rem Start %1.db via DBSRV6:
"%ASA%\dbsrv6.exe" -x tcpip{ServerPort=2639} 
  -c 16m -gp 4096 "%DB%\%1.db"

Figure 7: run_dbsrv6_tcpip_95.bat
rem Start - Run Format: c:\amisc\ASAJava
  \run_dbsrv6_tcpip_95 [DBFileName]

rem Define shortcuts for long paths:
SET ASA=E:\Program Files\Sybase\Adaptive Server 
  Anywhere 6.0\win32
SET DB=c:\amisc\ASAJava
SET DEV=c:\amisc\ASAJava

rem Move to the development directory:
c:
cd "%DEV%"

rem Start %1.db via DBSRV6:
"%ASA%\dbsrv6.exe" -x tcpip{ServerPort=2638} 
  -c 16m -gp 4096 "%DB%\%1.db" 

Figure 8: run_java.bat
rem Example: c:\amisc\ASAJava\run_java DBDemo
SET ASA=E:\Program Files\Sybase\Adaptive Server 
  Anywhere 6.0\java
SET XMP=E:\Program Files\Sybase\Adaptive Server 
  Anywhere 6.0\jxmp
SET JDK=e:\jdk1.1.6\bin
SET TST=c:\amisc\ASAJava
c:
cd "%TST%"
SET CLASSPATH=.;%ASA%;%ASA%\jdbcdrv.zip;%ASA%
  \asajdbc.zip;%XMP%\asademo.jar

rem Run %1 as a Java application:
%JDK%\java %1 


[Home] [Back to Tip 83] [Forward to Tip 85] [Archives] [mail to: bcarter@bcarter.com]